I’ve updated the title to indicate the version to which this relates.
This is just one way of installing GivTCP!
It can be installed on anything that supports Docker Containers. Raspberry Pi, Synology Nas Drive and
Intel NUC are just three.
I use an Intel Nuc now and Proxmox as a hypervisor – its extremely easy to setup – I’ll not go through that process, but instead look at this Install and configure Proxmox VE
Once installed you will need to add a VM – I use Ubuntu 22.04 LTS currently. Usual rules apply when installing it – I only ever use it with CLI (Command line) and no graphical interface.
I then install portainer to manage the images – its not needed but I just find it easier!
Easiest way is to follow this Install Portainer Docker Ubuntu: Complete guide. (bobcares.com)
Once that is installed you need to add GivTCP – the easy way is with a Docker compose file.
With the advent of GivTCP 1.1.4 and later there are a few changes to the documentation on the GitHub – GivEnergy/giv_tcp: TCP connection (from inverter) and MQTT implementation
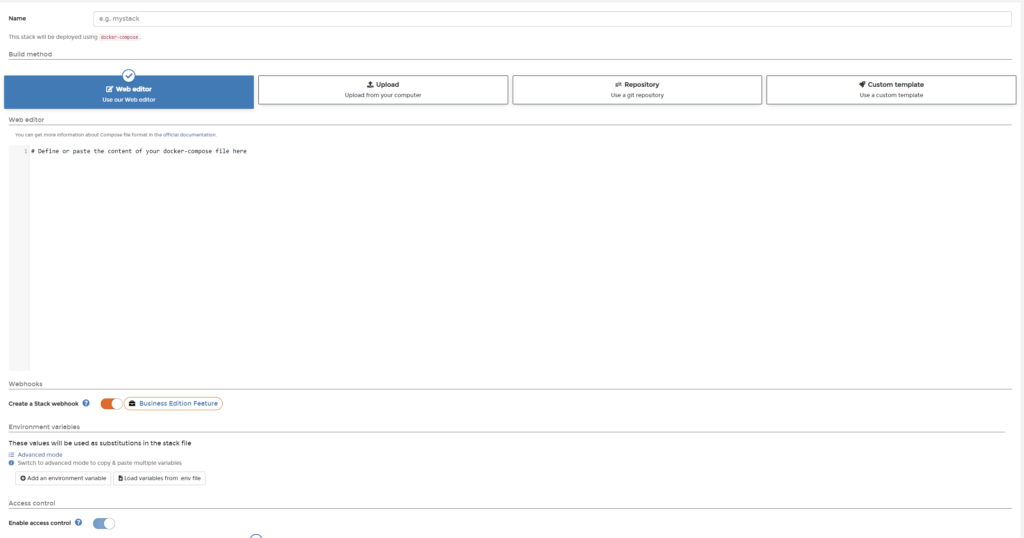
In Portainer you add a Stack – giving it a suitable name – I use givtcp – original (has to be lower case)!

In the editor add this:
version: "3.9"
services:
  GivTCP:
    image: britkat/giv_tcp-ma:latest
    ports:
      - "1883:1883"                   # MQTT
      - "6345:6345"                   # REST (add increments for each invertor)
      - "3000:3000"                   # This should match the WEB_DASH_PORT ENV below
      - "6379:6379"                   # Redis for job queueing
      - "9181:9181"                   # RQ Dashboard to view job scheduling
    environment:
      - INVERTOR_IP_1=192.168.1.193   # Set this to the IP address of your first Invertor on your local network

      - INVERTOR_IP_2=192.168.1.194   # Set this to the IP address of your second Invertor on your local network - not required if only one inverter!
      - NUMINVERTORS=1                # Number of inverters
      - NUMBATTERIES_1=1              # Number of battery modules installed and connected to the above invertor
      - MQTT_OUTPUT=True              # "True" if you want to publish your data to MQTT, "False" otherwise
      - MQTT_ADDRESS=192.168.1.170    # IP address of an existing MQTT broker, or leave as "127.0.0.1" to use the internal broker
      - MQTT_USERNAME=mqtt-user       # Username of your existing broker, if needed. Not required for internal broker
      - MQTT_PASSWORD=PASSWORD         # Password of your existing broker, if needed. Not required for internal broker
      - MQTT_TOPIC=GivEnergy/Data     # Root topic to publish data to. If left blank it will default to GivEnergy/<invertor_serial_number>
      - MQTT_PORT=1883                # Port of your existing broker, leave as "1883" for internal broker
      - LOG_LEVEL=Error               # Level of logs to be reported: "Error", "Info" or "Debug"
      - DEBUG_FILE_LOCATION=          # Location of log file stored inside the container, defalt location is /app/GivTCP
      - PRINT_RAW=True                # If True this will publish all inverotr data unprocessed as well as standard data
      - SELF_RUN=False                # If True the container will self-run and connect and publish data. If "False" the you will need to trigger externally via REST
      - SELF_RUN_LOOP_TIMER=10        # Wait time between every read command to the invertor
      - INFLUX_OUTPUT=False           # "True" if you want to publish your data to InfluxDB, "False" otherwise
      - INFLUX_URL=                   # URL of an external Influx instance
      - INFLUX_TOKEN=                 # Access Token for your Influx instance
      - INFLUX_BUCKET=                # Data Bucket of your Influx instance you want data sent to
      - JSON_OUTPUT=True              # Outputs the data in JSON format
      - INFLUX_ORG=                   # Influx instance Organisation
      - HA_AUTO_D=False               # If True (and if MQTT_OUTPUT is True) this will publish Home Assistant Auto Discovery messages to the broker
      - HADEVICEPREFIX=GivTCP         # Defines the preficfor all entities in Home Assistant
      - PYTHONPATH=/app
      - HOSTIP=192.168.1.107
      - DAYRATESTART=04:30            # Time in HH:MM when your day time tariff kicks in
      - NIGHTRATESTART=00:30          # Time in HH:MM when your night time tariff kicks in
      - DAYRATE=0.2422                # Price in £/$ for your daytime electricity per kWh
      - NIGHTRATE=0.2422              # Price in £/$ for your night time electricity per kWh
      - EXPORTRATE=0.075              # Price in £/$ for your export electricity per kWh
      - TZ=Europe/London              # Set to your Timezone
      - WEB_DASH=True                 # Enable the wed dashboard
      - WEB_DASH_PORT=3000            # Port to serve the web dashboard on
      - SMARTTARGET=False             # Enables the PALM capability, requires the three ENV below to be set
      - GEAPI=                        # API Key for the GivEnergy Cloud
      - SOLCASTAPI=                   # API key for Solcast
      - SOLCASTSITEID=                # SiteID for Solcast site (single array)
      - DATASMOOTHER=High             # Set the data smoothing to most agressive setting (High, medium, low)

    restart: always
    privileged: true
This is a slightly modified version of my compose file (Passwords etc removed.
Edit it to suit your installation!
If you have an MQTT broker (I do) then add the IP of the broker – if not and use the GivTCP internal broker instead, then use 127.0.0.1
Deploy the stack and it should all work – as long as you have the settings right.


